 Paintball's Online Museum
 | Paintball's Online Museum |
|
Navigation
Home
Marker Exhibit
Other Exhibits
Exhibit Stats
Search
|
|| VintageRex > Donate > Pictures Do you have good quality photos or your marker? Or perhaps some good action or group shots from yesteryear? What to help us fill out VintageRex.com? Then this is your chance! Review below for guidelines for taking and submitting photographs.Taking Pictures: Introduction Taking Pictures: Introduction Taking Pictures: Making a Marker Podium Once you have done that, clamp the board to a table, or use weights on the end to hold the board steady. Then you can place the marker on the dowel rod, inserting the rod into the barrel. This will allow you to take side photos of your markers quickly. You can turn the marker on the dowel rod to take shots of any angle of the marker. You don’t have to worry about the dowel rod damaging your barrel, as the wood is much softer than metal. If you take pictures with your full air tank and other items on the marker, you will want to exercise care that the marker isn’t too heavy to break the dowel rod. Taking Pictures: Outdoors Taking Pictures: Indoors Try taking pictures with out the flash. Flashes often wash out image or cause bright glares in the middle of the subject. You can experiment by either diffusing the flash (with some paper over the flash or a diffuser if available for your flash unit), or “bouncing” the flash off the ceiling or light tent (only available if you have a flash unit that tilts). If you want to go all out, get some natural lights from a photography store. Light bulbs in your lamps cast a yellow glow and will make your pictures look yellow. You can buy blue lights from photography stores that cast a blue light and will make your images more the correct color. Of course these put out more heat (usually they use 250wt-500wt bulbs and require lamps that can handle them). One other trick is to over expose your photos if the option is available on your camera. Indoor shots will generally come out dark and over exposure can help actually have a more natural looking exposure. Using a tripod may be required as they shutter may stay open so long that if taken by hand the photo will be blurred. (See what a pain indoor is, take your photos outdoors) Submitting Pictures: Photos Submitting Pictures: Scans Submitting Pictures: Digital If you got your digital image by taking photos and having the developer put them on CDROM, you may want to make sure that you add a bit of a margin around the subject as some developers may crop off you images. If you digital image are from a digital camera, use your highest setting if possible. A 2-3 megapixel image or higher is most desirable. If using a higher end camera you may want to use the next highest setting as the quality will be more than sufficient. Thank you for your interest and support! - The VintageRex.com Team!
|
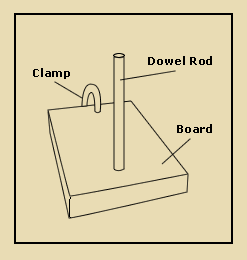 A simple device that will aid in taking pictures is making a marker podium. This simple device can be used indoors or out doors and clamped to a table or held down with weights on the ground. First you need a board about 2’x 1’ and about 1 ½” thick. Take this board and drill a ½” hole near one edge. Insert a ½” dowel rod that is about 22” long in the hole and use wood glue to insure that it remains straight and steady. You may need to use books or something to keep the rod straight as the glue dries. Allow the glue to dry a day before use.